

Disclaimer: I received free seeds from Homewood Nursery & Garden Center in Raleigh as part of this post. The review, thoughts, and observations in visiting Homewood Nursery and talking to their staff are honest and based on my own experience.
Last year, I got the itch to try my hand at gardening. History would have led you to believe that this was a horrible idea. I’ve been known to kill most houseplants including bonsai’s, money trees, and even succulents; all plants that I had previously been told were near impossible to kill. My friend even gave me a self-watering pot for violets and I couldn’t even remember to fill the bottom of the pot with water. Well, this time I was determined to change that streak (20ish years) of bad luck.
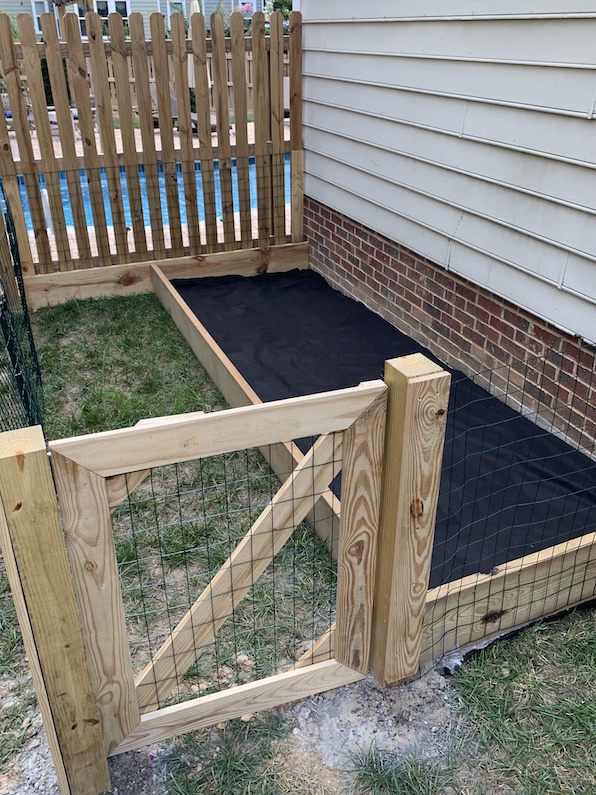
The catch? This desire hit me around July. That means I was working with extreme heat in North Carolina and starting from scratch. Well, I enlisted the help of my husband and my dad to craft a garden bed similar to my neighbor’s. I was envious of their enclosed raised garden bed and seeing them constantly outside reaping the fruits of their labor. We had a nice sunny patch of yard on the side of the house that would be perfect, so they set to work building my space. In the end, I had a raised garden bed that was fenced in to prevent the many bunnies and occasional deer that would come through our old neighborhood.
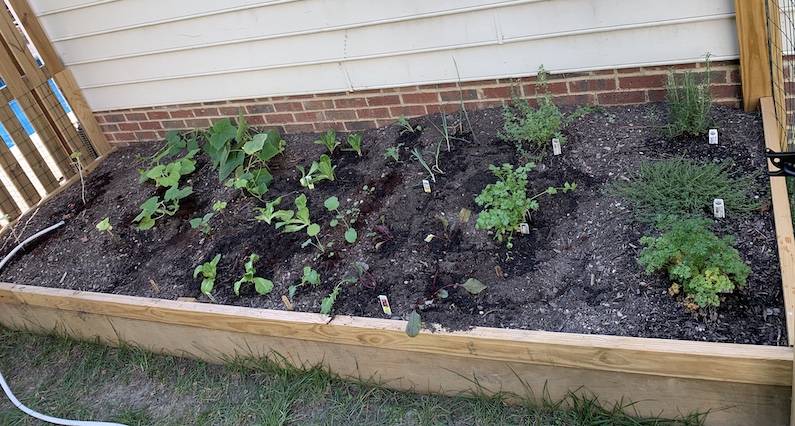
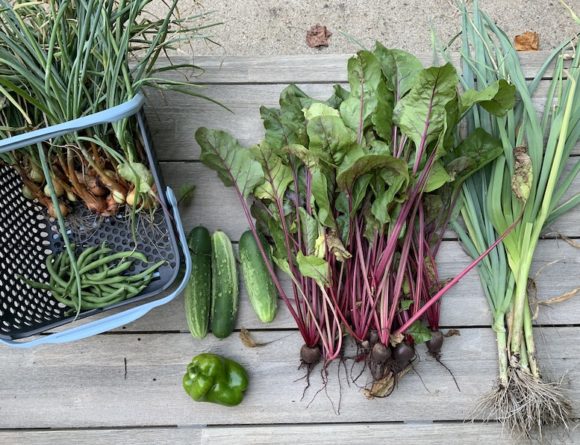
Because it was August, options of what I could plant were slim, but I went forth anyways. Lettuce galore, beets, cucumbers, and even pumpkin seeds were thrown in. It was survival of the fittest as I knew very little about what I was actually doing and was just hoping for the best. Well, consider me surprised when I realized that stuff was growing! Amazing what a little water and light will do. It helps that I had enlisted my kids to help me grow, and they were all too eager to water the garden every day. Soon enough, we even had our first cucumber! The kids were so excited following the progress of the garden, and I loved involving them in the process so they could see how we get fruits and vegetables.
Fast forward to November. The house, including the beautiful Garden 1.0 has been sold to a friend and we have moved to a new one that was a better fit for where our family now was. I hated to leave our beautiful backyard, the amazing pool and outdoor living space we had put in, as well as the hard work I put into our garden (and my beloved fig trees!). But I knew I could start again once I got settled into the new house. The best part though is that because we sold our house to good friends, they fill me in on the progress of the garden! She in fact just told me that the garden is thriving and they can’t even keep up with the amount of produce that it provides. Not too shabby for someone who just threw down some seeds and crossed their fingers!
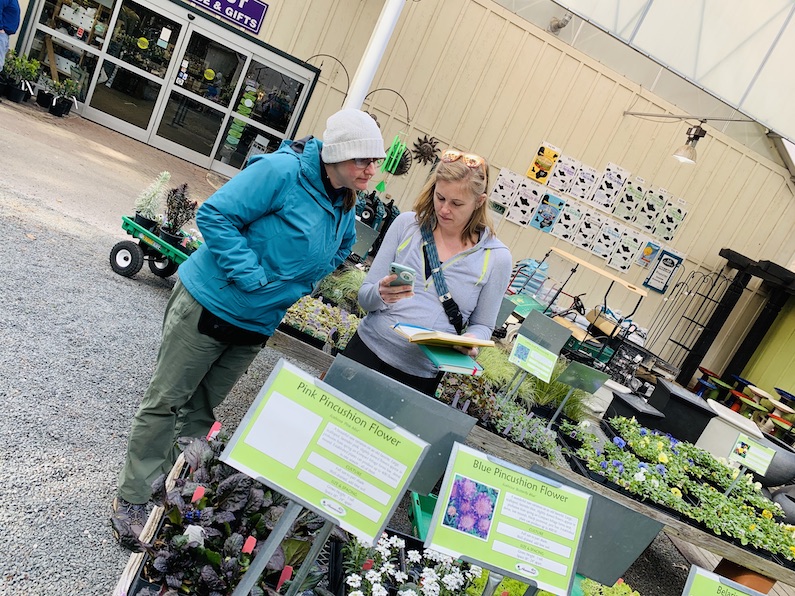
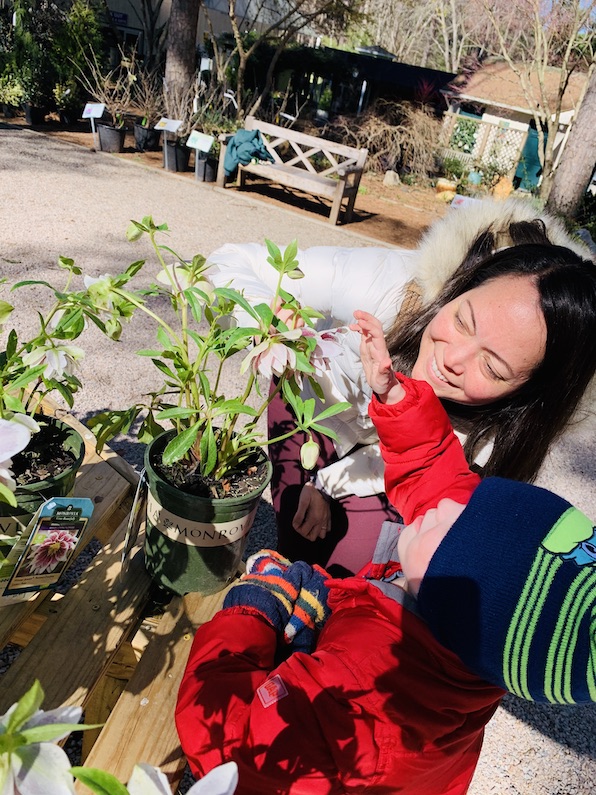
That gave me hope. Could I replicate that success at our new house, but maybe this time, start early enough to make use of most of the various growing periods and try my hand at a few other items? I knew I was going to need some expert help. I headed to Homewood Nursery and Garden Center in Raleigh, where I had begun this journey the year prior. Not only did I want to start this vegetable garden, but I wanted to get some fig trees established on our property, stat. They had really helped me to walk through the process last year to where I even gathered some fruit from those fig trees early in the Summer.
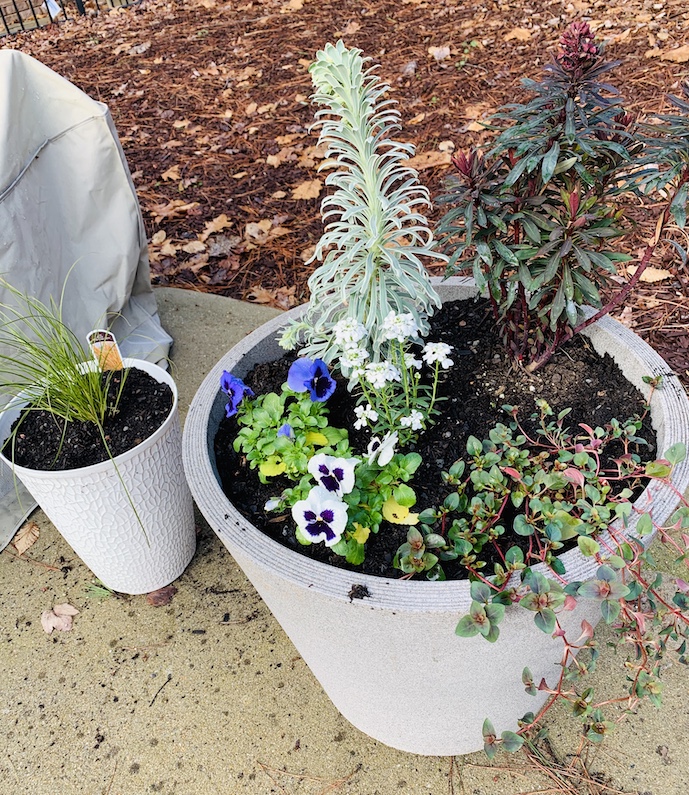
Tina helped me select some seeds based on items that my family enjoys, and Jessica is my go-to outside plant guide who I bump into every time I’m there. She is a wealth of information and was the employee who originally guided my fig tree journey. Homewood has a huge selection of items, but I’m never left to just read the tags on the plants; they have employees roaming all over who can offer assistance, walk you through your plant woes, or provide recommendations based on your home and yard conditions. Now that we are in our new house, I needed a new fig tree (one to start, another one to be added soon!), some plants for my shady front porch, and plants for my vegetable garden. Their staff was excellent at recommending various options that worked with my skill and maintenance requirements (read: low).
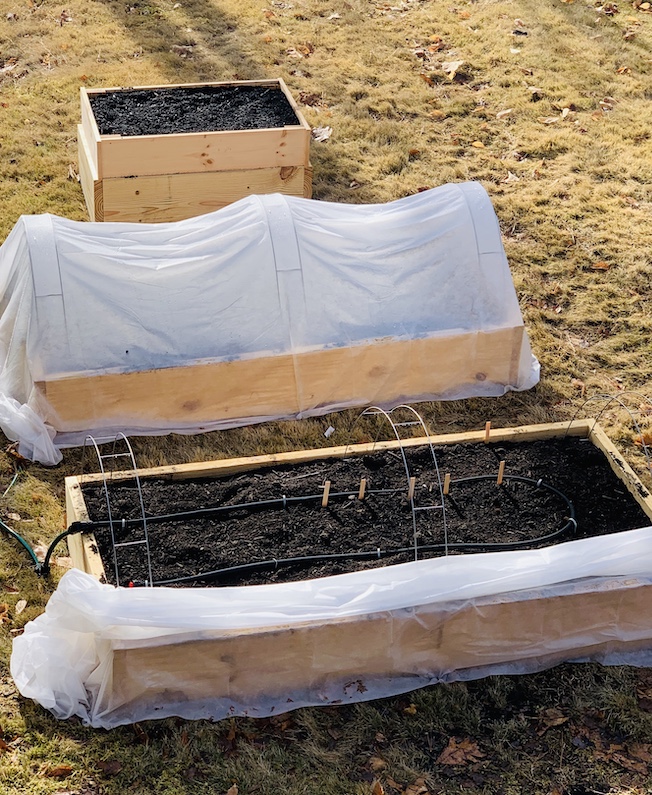
At the same time, I was planning out my garden beds. I knew I wanted to go the raised bed route again. Our area is notorious for the hard clay soil, and my previous raised bed thrived. If it ain’t broke… I set out building my planting strategy and worked with my husband, who would be building this final solution, at designing the specs accordingly. Ultimately I decided on two 3x6ft beds. I wanted them to be big enough to hold a wide variety of items, but shallow enough where I could reach across without having to step into the bed to access anything. Later, as I was plotting out where everything would go, I decided to add in a third, smaller bed specific to potatoes. After some research, I found that potatoes do not do well with tomatoes (in bed #1) or squash-type plants (in bed #2). The soil depth is also greater so it just made sense to make one more bed. We had extra wood so we decided on a 2×3 ft bed for the potatoes.
Now onto the layout of the vegetables. Tina had provided some guidance about which vegetables I should plant and she mentioned that some do not work well together. As I started working on mapping everything out and looking for inspiration, I fell into the Pinterest rabbit hole. Thankfully, I was able to reign it in after stumbling across three main points:
- Square foot gardening. My previous garden bed was a giant cluster of random seeds wherever I could find space. Because of this, my cucumbers took over half of the bed and strangled my poor pumpkins. Other plants just didn’t have enough room to grow. Seeing examples of square foot gardening had me completely sold on the concept. It was the first step in laying out my garden footprint.
- The next important item I took into consideration was planting complimentary items together, and moving those that don’t work well to a different location. It was a fun puzzle to piece together (and also the reason why I needed a bed just for those darn potatoes). I used the Companion Planting Guide from The Seed Supply as a resource.
- Finally, a planting schedule! A lot of the seeds said ‘after last frost’ or similar terms. What? When I spoke to Tina while picking out my seeds, there were a few items that she had said to either hold off on or that were cold weather vegetables. There wasn’t an issue with the latter necessarily, but our cold season is starting to come to an end, so I wanted to focus on the upcoming warmer weather. I wasn’t sure how long it was going to take me to get these beds up and running and I didn’t want to feel rushed at trying to plant something that wasn’t in the right season. This is where the Farmer’s Almanac came in. I found their website when searching for dates of the last frost for zone 7 (our zone here in Raleigh), and was able to do a zip code search that gave a full calendar for a huge selection of vegetables and when to plant them indoors, transplant outdoors, or to just start outdoors. Score!
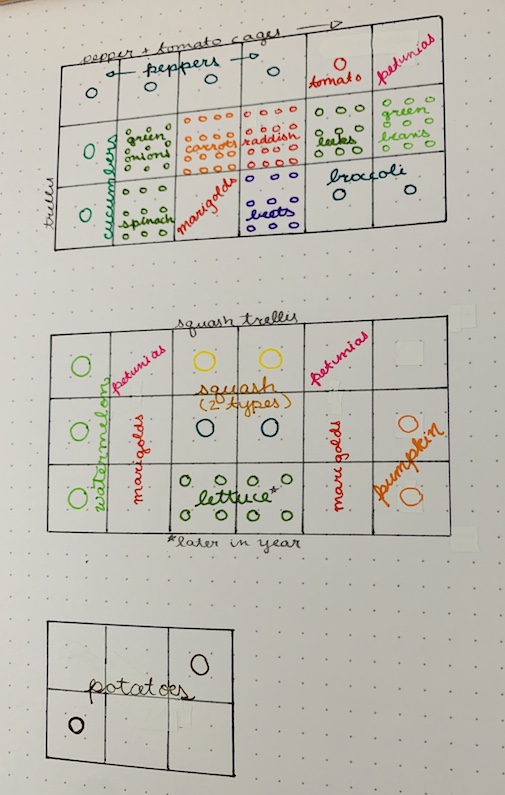
Thankfully, I drew out these layouts in pencil to start as I was constantly revising them and moving plants around as I studied the Companion Planting Guide, schedule, and picked out other items that I wanted to incorporate. Once I figured out the final layout, it was time to implement.
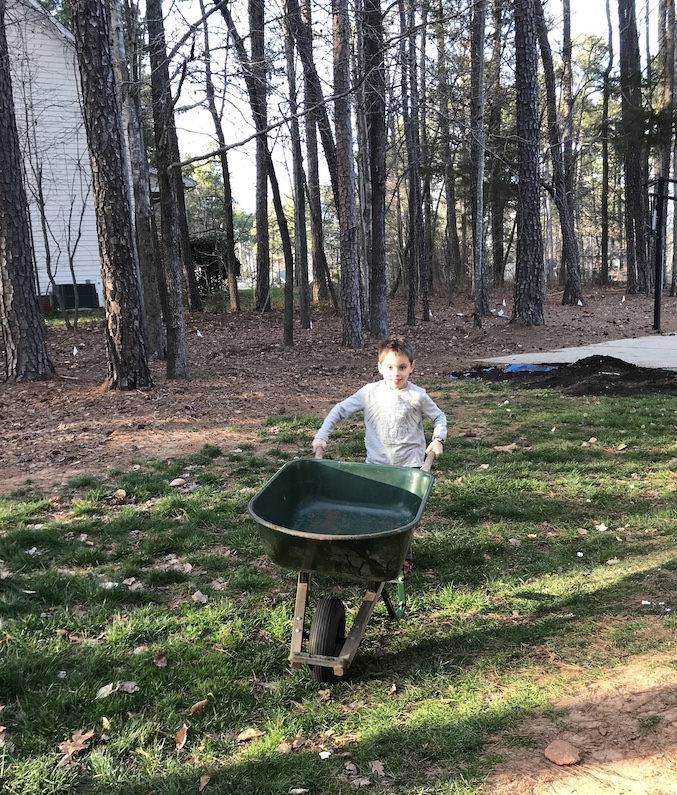
Setting up the garden was a whole family affair! James and the boys helped to load in the dirt that I had delivered. I needed a large quantity for the three beds and some other projects outside of the house, so we had a compost/manure mix delivered by a local company. Homewood also sells various soils that I typically use for my projects, but I needed the bulk solution for this project. Once the beds were full, I setup an irrigation system. I used a simple soaker system that I picked up from Gardener’s Supply, that was specific to raised beds and offered a bed connector option. It was simple to install, relatively inexpensive, and should make watering the beds pretty painless. I used the stakes that hold the hose within the garden bed as markers for my square foot layout. You could also use wood or string, but this was one less step that could easily be done with the tools I had on hand during the installation.

Finally, it was time to sow the seeds! I did a combination of indoor and outdoor planting. I started the following seeds directly within the raised beds:
- Green onions
- Carrots
- Radishes
- Spinach
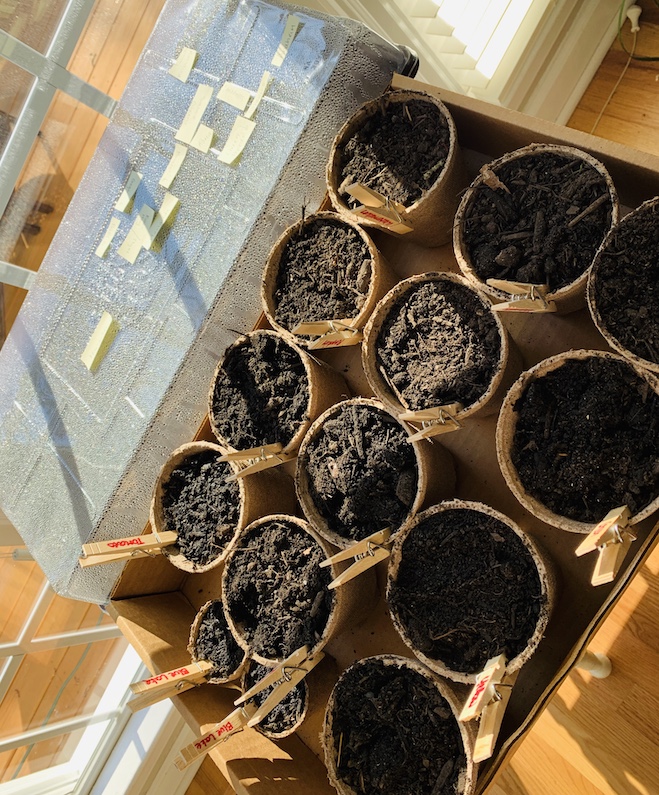
Indoors, I used a planting tray to start seeds that need to transfer after the frost or once they are a bit more established:
- Various peppers
- Roma tomatoes
- Green beans
- Some herbs, salad greens, and pest controlling flowers (petunias and marigolds)
I also prepped the next round of indoor planters for squash, cucumbers, watermelon, and pumpkins. Those seeds won’t go in for another couple of weeks and will stay indoors until the weather warms up a little.
It has been such a fun and satisfying experience from start to finish: plotting and charting out the schedule and layout, determining the placement and construction of the beds, planting the seeds and now, watching them start to sprout. I also like that you don’t have to start with seeds. As the season progresses, Homewood is starting to put out various plants that are ready to immediately transplant outside. I had originally said I wouldn’t do the cold weather plants like various greens, but as they had them in stock and I’m waiting for other plants to be plants, I picked up a few that were already advanced enough that I could get them in the bed to enjoy the rewards earlier in the season.
Let’s not forget that gardening is proven to be therapeutic. NYU even has a horticultural therapy program that claims: ‘By working with plants, you can gain a sense of personal accomplishment, productivity, self-reliance, and independence.’ As someone who has struggled with anxiety, gardening has provided a nice outlet where I can slow down, enjoy working outside, and see the actual products of my efforts. The linked article from Psychology Today reviews some of the history of gardening and the mental and physical effects it can have on an individual.
Now that the initial work is done (figuring out where to put the garden, clearing it out, building the beds and filling them with soil), it’s going to be a much easier process each year. I also very much acknowledge that I am a beginner in this process. This is all completely new to me and I know some things may not work, I might kill them off, or they may not do well for one reason or another. Thankfully, seeds are pretty inexpensive, and even the transferable plants are a reasonable price. Ultimately, I have confidence in the process. Even if everything doesn’t work out, I know I’m going to get some great produce from this. If I can harvest a majority of the items that I plant and make this a regular occurrence, I’ll have the satisfaction of my own supply of produce (one less trip to the grocery store!), potentially some dollars saved in the process once it’s all said and done, and items that I know the origin of. They came straight from my own backyard garden!

Some of my favorite gardening resources for my beginner vegetable garden experience:
- Homewood Nursery and Garden Center in Raleigh, of course! If you’re local to the Raleigh area, definitely check them out. Their staff is friendly and knowledgeable, and can walk you through your garden needs and desires. They also have various planting guides that you can pick up in-store or download online.
- Gardeners Supply has a lot of the base items you may need for setup. In fact, you can buy ready-to-assemble beds directly from them if you don’t want to seek out various lumber types and cut them up. Honestly, the price can be pretty comparable, especially if you sign up for their mailing list and get one of their frequent coupons. Other items can be expensive, but I do comparison shopping between them and Amazon.
- If you do want to go the do-it-yourself route, this tutorial provided a nice refresher for building our new raised beds.
- The Old Farmers Almanac Gardening Calendar prevented me from planting things way too early and gave me actual date ranges and planting types to target.
- If you know me, you know I don’t do bugs. Various websites provided guidance about how to prevent pests naturally. Here are a couple of my favorites: Squash bugs (creepy AF), general natural pest solutions.
- Square foot gardening details galore. I linked my favorite chart in the section covering square foot gardening, but take a look at this Pinterest search which will provide a plethora of options.

1 Comment
[…] back to the beginning of my vegetable garden journey post back in March, it’s crazy to see how far it has come. My garden is […]
July 9, 2020 at 10:45 am